Valentine, You are Dino-Mite!

Standard

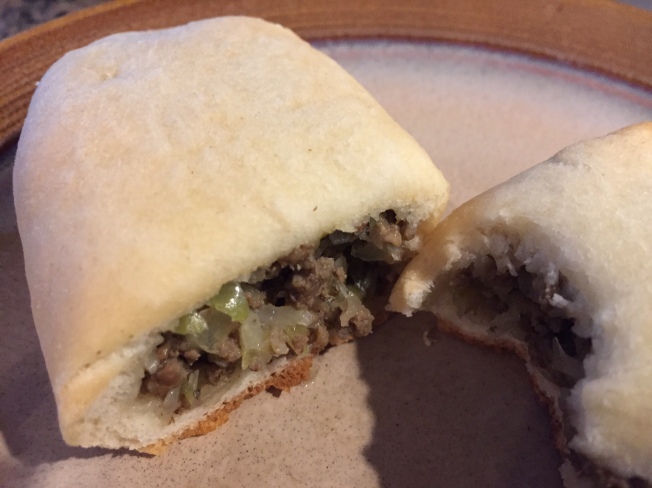
If you are looking for a easy recipe to make for dinner tonight…this is it!  This is another one of my FAMILY FAVORITE!
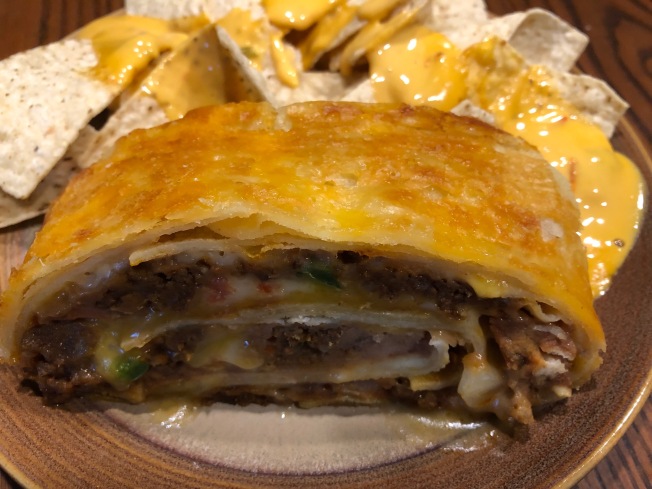
img_3274

Giant Taco Roll

Ingredients:

5 cups shreded Mexican cheese blend

20 mini corn tortillas (about 4-inches round)

1 tablespoon vegetable oil

12 ounces chorizo

1/2 package of taco seasoning

1 tablespoon tomato paste

one 15-ounce can refried beans

1 cup pico de gallo, drained, plus extra for serving

Guacamole and sour cream, for serving

  1. Preheat the oven to 350 degrees.  Line an 18 by 13 inch pan with parchment.
  2. Sprinkle 1 1/2 cups of the cheese evenly over the parchment.  Arrange the tortillas to fill the pan in rows of 4 so that they are overlapping.  Sprinkle another 1 1/2 cups of cheese on top and bake until the cheese is slightly dry and not greasy, but not yet brown, about 20 minutes.
  3. Meanwhile, heat the oil in a large skillet over medium high heat.  Add the chorizo and taco seasoning and cook, stirring and breaking up any clumps until brown, about 5 minutes.
  4. Add the tomato paste and 1/4 cup water and simmer, stirring occasionally, until most of the liquid has evaporated, about 3 minutes.
  5. Spread the refried beans on top of the tortillas, leaving a 1 inch border on the 2 short ends.
  6. Spoon the chorizo evenly over the beans, followed by pico de gallo.  Sprinkle the remaining 2 cups of cheese on top.
  7. Starting at the short end, use the parchment to help you tightly roll up the taco.
  8. Return it to the oven and bake until hot trough and golden brown in parts, about 15 to 20 minutes.
  9. Move roll on to a cutting board and slice with a bread knife.
  10. You can serve it with pico de gallo, guacamole and sour cream. Enjoy!!!

You are Dino-Mite!  Happy Valentine

My latest and greatest craft idea came from That’s What Che Said blog site.  It is a free printable design that you can download from the link below.   This site also has a lot of different cute valentine printables to choose from.  The plastic dinosaurs came from Freds.  I  used my hot glue gun to attach it to this cute card.  Super Simple Idea!

IMG_3511

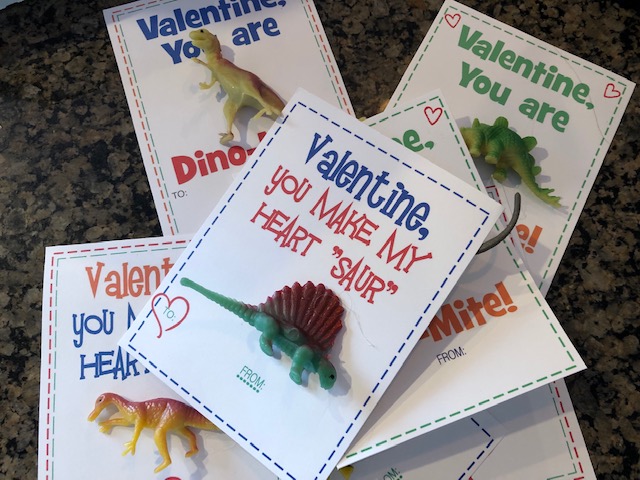
Link for the free printable:

https://www.thatswhatchesaid.net/dinosaur-valentines-card-free-printable/

The pocket dino bag and puppets machine embroidery design came from Sewing For Sarah website on Etsy.  A combination of two designs to create this –   Digital Download Pumpkin Truck Vintage Snap Pouch (make the bag) and Digital Dinosaur Finger Puppets Pocket tin Embroidery (make the design on the bag and the puppets.)

It is always fun to get something in the mail.  My little nephews and niece are going to get a kick out of this.

Happy Valentine Care Packages

Photos of my Valentine care packages for my two boys.  This year I made coffee mugs with photos from our 2018 Christmas.  I used Shutterfly to make the mugs.  I placed mug muffins, mug brownie, lots of snacks and candy also in their Valentine care packages.  I hope that they will look at it and smile.  Happy Valentine’s Day!


A Glimpse of Beautiful Washington in February

Brrrr…but very beautiful!

Seattle Tunnel 2 mile walk – #2


“All you need is love.  But a little chocolate now and then doesn’t hurt.”  Charles M. Schulz
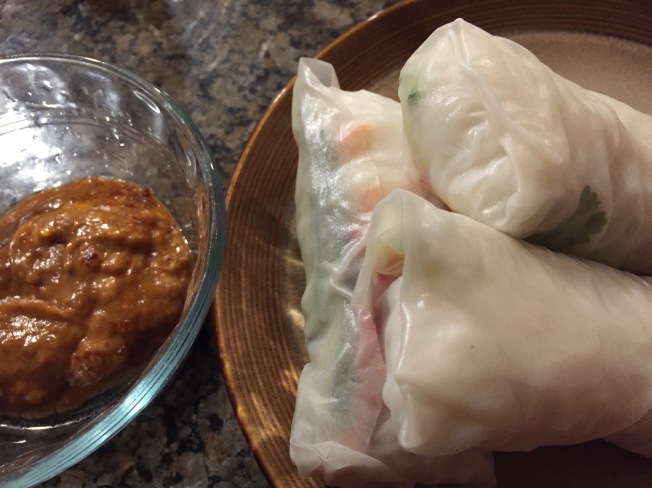
 

Nice Start to a New Year

Standard

Welcome to a New Year- 2019!  It is hard to believe 2018 is over and now on to a New Year!

I have been wanting to post this recipe on my site for some time but haven’t had the time to sit down and write it out.  So now I finally have it done and offically on my blog.  I can now set to pull it up on my iPad and load into Paprika app.  I love, love, love this simple recipe! Enjoy.

California Garlic Shrimp, Lemon, Spinach Pasta

Ingredients

  • 8 ounces linguine pasta
  • 1 pound peeled, devained  shrimp
  • package spinach leaves/bundle
  • package cherry tomatoes
  • 1 Tbsp minced garlic
  • 1/4 cup lemon juice
  • 1/4 olive oil
  1. Heat water for pasta and follow directions on package to make pasta.
  2. Night before cover shrimp with California Garlic Spice.  I buy the shrimp at Fred Meyers and it already done for you.
  3. In pan add little olive oil, garlic and shrimp.  Cook shrimp for two minutes on each side until fully cooked.  Next remove shrimp from pan.
  4. Using the same pan add 1/4 cup juice, 1/4 cup of olive oil, spinach and tomatoes in pan and cook till it starts getting soft. (it will only need to cook for a couple minutes)
  5. Last step add shrimp, cook for a couple more minutes,  place over pasta and done.  Very easy, yummy and my family favorite!


Free Cute Embroidery Machine Design Patterns

There are tons of free embroidery machine patterns online.  This is my latest art work that I made all using Free designs that I found online and websites listed below:

Rooster came from Brother-

https://www.brother-usa.com/inspiration/projects/free-sewing-and-embroidery

Sewing Machine Key fob & Poppy Coasters came from Kreative Kiwi-

https://www.kreativekiwiembroidery.co.nz

Beautiful Washington In January

My New Year’s Resolution this year is to complete 12 races in 12 months with my family and friends.  So far off to a great start!

img_3385

Meridian Valley 5K

“There are far, far better things ahead than any we leave behind.” – C.S. Lewis

Grandma’s Blueberry Torte

Standard

Grandma’s Blueberry Torte

IMG_1541

My grandma had a huge heart.  She was a very loving and kind woman that I was so blessed to have her in my life for so many years.  Blueberry torte was one of my Grandma’s favorite recipes.  When she had company she always enjoyed making this desert.  I know why she made this recipe because it is quick, easy and very tasty.  It is another recipe that you can’t mess up.

Image 2

Graham Cracker Crust Ingredients:

20 graham crackers

1/2 cup butter

1/2 cup sugar

Mix and put in 13 X9 pan.  (Or you can buy the tiny pre-done graham cracker crust tins at Fred Meyer.  It comes in a package of six and is around $2.00.  If you do use the predone graham cracker crust split the cream cheese filling recipe in half. )

Cream Cheese Filling Ingredients:

2 eggs

2 T. lemon juice

1 (8 oz.) cream cheese

1/2 cup sugar

  1. Mix eggs, cream cheese, lemon juice and sugar together.
  2. Place mixture in pan and bake 20 minutes at 350 degrees.
  3. Put blueberry pie filling on top and chill.  Enjoy!

IMG_1538

 Sewing Art (Brother Innov- Is NS1750D)

Below are some of my latest projects that I have created with my new embroidery machine.  I have only had this emroidery/sewing machine for a few months.  I wish I would have purchased a machine that could handle a bigger hoop size.  This Brother Innov NS1750D machine can only create 4 X4 hoop projects. So you’re limited on what you can make…but still there is a lot you can create with this little sewing machine.  Just load the PES file on a stick into your machine, push a button and let the embroidery machine do the work.  Super easy and amazing what can be created with little amount of sewing knowledge.


Anita Goodesign


Sweet Pea Design (lot of free patterns online – this is one)


Parker on the Porch Designs – football bears & cat unicorn/ Sweet Pea Design – bags


Kimbell Designs- bicycle bag/ Sweet Pea Design – small mug rug (another free design)


“If it doesn’t challenge you, it won’t change you.” – Fred Devito


IMG_1441

My son’s 1st marathon and many more to come.  Congratulations!!!


Spring into Spring

Standard

Spring Sewing Ideas

Two months ago I purchased my 1st embroidery sewing machine- Brother 1750D.     It has a 4 X 4 hoop, with lots of neat stitches and designs already on the machine (which is fine for my needs).  For a beginner this is a great machine to start with.   The Brother 1750D is super easy to use and doesn’t take a lot of skill to create cool professional looking projects.

Below is some more stuff I have created:

One thing living in Seattle, you can get fresh fish at the grocery stores.  I lived most of my life in the Midwest and that was not the case.  Below on this page I have a couple quick shrimp recipes that are delicious and only takes minutes to make. Enjoy!

Bang Bang Shrimp

IMG_1217

1/2 cup mayonnaise

1/2 cup sweet chili sauce

1/2 tsp Sriracha

1 pound shrimp (shelled and deveined)

1/2 cup buttermilk

3/4 cup cornstarch

canola oil for frying

Tortillas

Lettuce

  1. In small bowl mix mayonnaise, sweet chili sauce and sriracha. Put aside.
  2. Second bowl coat shrimp with buttermilk.
  3. Remove shrimp and coat the shrimp with cornstarch.
  4. In heated pan add 2 -3 inches of canola oil and heat to 375 degrees.
  5. Fry shrimp until lightly brown (only takes about 1-2 minutes on each side).
  6. Once fried coat with the sauce (from step #1)
  7. Place tortilla, bed of lettuce (I use the Chop Lettuce kits – has lot different veggies in it) and place shrimp on top. (It is not the healthiest recipe out there but it is good once and awhile.) Enjoy!


Spring Rolls and Peanut Sauce

IMG_1256Peanut Sauce

24 oz creamy peanut butter

20 oz hoisin sauce

1 T chili paste (depending on how spicy you ould like it to be)

1 -2 cloves fresh pressed garlic

pinch sugar/salt combo for taste

IMG_1253

  1. Heat equal parts water and peanut butter on low until smooth (blend should be thinner than desired consistency).
  2. Sir in hoisin sauce, chili paste, and garlic (you can find all of these ingredients in your local grocery store).
  3. Sprinkle sugar/salt.
  4. Peanut sauce can be added inside spring roll or the roll can be dipped.

Spring Rolls

Cooked shrimp (sauce it in sesame oil with garlic or buy the cooked shrimp prepackaged)

Cucumber (cut into thin slices)

Fresh Cilantro

rice vermicelli noodles

Rice paper

  1. Cook noodles and cool immediately with cold water.
  2. Wet the rice paper and lay flat on the table (one corner hanging off the end to make it easy to peel off).
  3. Lay out ingredients, start with shrimp, cilantro, cucumber, and noodles on top.
  4. Fold one side in pressing the rice paper so that it sticks together, fold other two sides to meet in the center, and tightly roll all the ingredients up in the roll.
  5. Other ideas – You can also add bell peppers, zucchini, spinach, carrots or onions.
  6. Yummy!


The only impossible journey is the one you never begin!

IMG_1032

Go Seahawks!

Standard

Seahawks Apron

I just bought a embroidery sewing machine- Brother 1750D last week.  It has been a bit of a learning curve as I continue to figure this out. The main difference is pushing a button to start the machine instead of a pedal.   Each time it is getting easier to use.  It is amazing how professional my projects look when it is finished and fun to watch the machine work.  This is one of my first projects I’ve made with this machine.  I’m in the process of making cookbooks for my kids.  So I thought it would be fun to make Seahawk aprons to go with it. So this is what I came up with…Go Seahawks!!!

IMG_1183

Materials:

Brother 1750D embroidery machine

Dark Blue Fabric 22″ X 28″

1/2 yard fabric for ties and pocket  (2 strips 2 1/2″ by the width of fabric & large pocket 8″X18″)

Thread and basic sewing supplies

IMG_1180

  1. I used my Brother 1750D machine to embroidery the #12 on my fabric.  (Per Wikipedia – The Seattle Seahawks retired the number 12 jersey on December 15, 1984, in honor of their fans.)
  2. Folded the fabric over and sewed on all four sides of the main apron fabric.
  3. Dark blue fabric fold the top to find the center.  Measured and marked a line 4 inches on each side of the center mark, creating a center 8′ dimension.
  4. Measure and mark 15″ from the top edge on both sides of apron.
  5. Using your ruler, draw a line from the 8″ mark to the 15″mark on both the right and left side of the apron.  This will help create the finished edge of the casing.
  6. Measure 1 1/4″ from the finsihed edge and mark a fold line. Next measure 1″ beyond  the fold lines and cut the corners off both sides of the apron.
  7. Fold both trimmed edges to the back side of the apron and press on the 1/14 fold line, then fold again on the finished edge.  This will create a casing and pin into place.IMG_1181
  8. On the back side of apron, stitch along folded edges to create a casing.
  9. Sew top stitch on large pocket fabric.  Next iron 1/4″ of the fabric edges on both sides and bottom.  Pin large pocket on bottom of dark apron fabric.  Stitch around the outside edge of the pocket.
  10. I also added a small pocket above the #12.  I used a 4 1/2″ X 5″ piece fabric that matched the bottom large pocket to make this pocket.  Sew top, iron edges, pin above #12 and stitch around the outside edges (on the right side from side to bottom  to side of pocket).
  11. Stitch the strips for the apron strings together.  Press the seams open.  Fold the strip lengthwise with the right sides together, raw edges even and sew.  Leaving an opening to turning near the center of the strings.
  12. Use a large safety pin, thread through the apron casing.  Continue from right side casing to the left side casing.
  13. Super duper easy!

IMG_E1235 (1)

With the extra scraps I made a matching mug rug…Go Seahawks!

Cilantro and Lime Rice

IMG_1187

This is a great side dish with chicken or fish. It is also another simple recipe to make with very few ingredients.

Ingredients:

1/2 tsp canola oil

1 chopped onion

2 or 3 cloves of garlic

2 cup long grain rice

4 cups chicken broth

2 fresh limes

1/4 – 1/2 cup chopped fresh cilantro

  1.  Add oil, garlic and onion in saucepan over medium heat; cook for 5 minutes until tender, stir frequently.
  2. Sir in rice, chicken broth and fresh lime juice.
  3. Bring to a boil; reduce heat, cover and simmer 15 minutes or until rice is tender and liquid is absorbed. Remove from heat.
  4. Add desired cilantro into rice.


                        Where so ever you go, go with all your heart.

IMG_1413

Happy 2018! Off to a Good Start

Standard

Take time to write down your goals, your hopes and dreams!

Happy New Year…make 2018 a GREAT year!


I saw this on facebook and had to put it on my blog.  It is so perfect with some great tips for this coming year. :0)

26172453_10155141260196299_1167544445169753974_o.jpg

George’s Ground Meat Jerky

This is one of my family favorite New Year day snack… homemade beef jerky.  Over the years my boys would make homemade beef jerky with their grandpa.   Last year sadly he passed away.  Our holiday this year feel a bit off without him.  He loved smoking meat and made the best beef jerky.  This is his recipe.  It is a very tasty!

18920848_10209812809333895_8349445552655315984_o-1

Ingredients:

10 lb. lean ground beef (ground chuck is best)

6 Tbs salt

4 tsp pepper

4 tsp garlic powder

2 tsp cayenne pepper

2 tsp marjoram

4 tsp accent

2 oz liquid smoke

2 oz water

Mix well, let stand over night.

  1. Roll into sheet 1/4″ thick/ Cut into circles with biscuit cutter. Smoke low (165 degrees) 4-8 hrs.  Very hard to cut with biscuit cutter.

Better way!

  1. Line a 8″ X 8″ cake pan with Saran wrap, leaving a flap to fold over the top.  Pack the ground meat into the pan, being careful to get into the corners and bottom very good, with no air bubbles.  Continue to pack the meat into the pan.  Be very careful that there are no bubbles or holes in the meat, pack the pan full and then fold the Saran wrap over the top.
  2. Smooth over the meat and then remove the meat from the pan.
  3. Place in freezer over night.
  4. When frozen, slice into 1/4″ slices with a sharp knife or a meat slicer.
  5. Put in smoker at low temperature (130-140 degree) until done, usually 5-6 hours.
  6. Enjoy!

Snowman Poop

FullSizeRender 2

Holidays are a crazy time of the year.  I didn’t get a chance to post this on my December blog posting.  This is another craft idea I created this Christmas for my daughter to give to her friends and also stocking stuffers for my boys…Snowman Poop.  I thought it turned out really cute.  Here is a couple photos of what I used to make it, the cute saying on the back and finished.


All you need: candy canes, white tictacks, snowman peeps, piece white, green & red paper, glue stick, hotglue gun, decorative circle punch (HobbyLobby), ribbon, snowman tags (got at Walgreens) and color pencils.

The printable circle image and back saying came from this website (free): https://www.splitcoaststampers.com/gallery/photo/2080315

The front: Snowman Poop

The back saying:

“Heard you’ve been naughty so here’s the scoop- all you get for Christmas is snowman poop.”

  1. I cut out the snowman poop circle (colored in the snowman scarf & hat with colored pencils) and back saying.
  2. I used a glue stick to glue the snowman poop circle to the decorative circle, back saying on color paper strip and snowman poop/decorative circle to the top of the color strip.
  3. I also used a hot glue gun to attach the strip to the tic tack container.  Super duper easy!  I love pinterest.


With the new day comes new strength and new thoughts.


IMG_1031

2018 New Year Day 5K

Happy New Year!


Ho! Ho! Ho! Hurray, It’s the Holiday Season!

Standard


This is my favorite time of the year.  I love coming up with fun Christmas crafts and of course making tasty treats.  This year I made these cute little Hershey’s Reindeers for my little nephews and niece.  It was a lot of fun to make.  All you need: Hershey’s candy bar, two candy canes for the antlers , brown construction paper for the ears, red pompom for the nose, two craft eyes, ribbon, bell or anything else you wish to use to decorate it.  I used a hot gun to put it all together.  Super, duper easy!!

IMG_0911

Each year I like to create something that honors one of my grandparents from each side.  This year I made Merry German Christmas tiny books (2 1/2 inches).  It is in memory of my Grandma Dorothy.  I also made cute little crochet doily ornaments in the memory of my Grandma Louise. The ornaments and tiny Merry German Christmas books fits easily inside this year Christmas cards.  I created something very similar last year and it was a hit!  So I think my relatives will like it.

I used Presto Photo to create these tiny books. The easiest way to create this project is to first designed the pages (total 20 pages, not including cover & back page) and then load into Presto Photo web site.  It is a lot easier to create the tiny books that way.  Each page gives a little bit of German Christmas traditions and my Grandma Dorothy’s family stories.   Here is the link: https://www.prestophoto.com/.  It is very cute when it is done.

IMG_0900 (1)


The Christmas snowflake ornaments I made is a simple crochet doily.  I sooked it in cornstarch and water to make it stiff.  Next made a cute little tag, round clip and add ribbon.  On the front is a image of kids sledding in the snow.  The back it has a sweet little poem: “A memory of Louise a little tribute true and tender just to show that we remember.  Time may pass and fade away but memories of you will always stay.”  My Grandma Louise was extremely talented and crocheted many beautiful tablecloths and hangings for her friends and family during her life.  Besides being really creative she was also a wonderful cook.  I was so blessed to have two loving and caring Grandmas that were a big part of my life for many years.


Some more Simple Christmas ideas to make-

The stockings I used Simplicity 1516 pattern.  It is another super, duper easy project to make.  If you are a beginning sewer you will have no problems making this project.  The  back of the Christmas Tree Cakes is were I got my tags.  It is definitely a weekend project.  It coming together very quickly!

IMG_8660


The greatest gift you can ever own is not found in the shops or under your Christmas tree.  It is found in the hearts of your loving family and your true friends.

–   healthythoughts.in

IMG_1436

Go Big Red! Husker Runza

Standard

IMG_0532

Coming from Nebraska, everytime I make this recipe I think of home.  The dough is easy to work with and this is a very simple recipe.  Go Big Red!…Go Seahawks! 🙂

Ingredients to make this Runza recipe:

4 1/2 c. all-purpose flour

1/4  c. sugar

2 packages active dry yeast

1 teaspoon salt

3/4 c. milk

1/2 c. water

1/2 c. shortening

2 large eggs

Meat Filling: 

2 pounds 90% lean ground beef

1 medium onion, finely chopped

4 c. finely chopped cabbage

2 tsp. seasoned salt

1 tsp. garlic powder

t tsp pepper

  1. Place 1 3/4 c. flour, sugar, yeast and salt in a large bowl.
  2. Heat the milk, water and shortening to 120 – 130 degrees. Pour over flour mixture and next add eggs.  I use a electric mixer on low speed until blended.
  3. Beat on high for 3 minutes.  Stir in remaining flour.  Next switch attachment on electric mixer to hook- knead until smooth and elastic for 8 minutes.
  4. Place dough in greased bowl, cover and let rise in warm place until double or about in hour or so.
  5. While dough is rising, in a large skillet, cook beef, cabbage and onions over a medium heat. Add seasoned salt, garlic powder and salt, cook until meat is done & cabbage is wilted.
  6. Divide dough into 4 portions and work at one section of dough at a time.  Roll out dough using pizza cut I cut into four sections about 6 inch squares. Next place meat mixture in the center of the squares.  Add a little water around the edges of the squares and fold over dough over fillings, forming rectangle.  Pinch edges tightly and the little bit of water will help keep the seal and place on greased baking sheet.
  7. Before you bake the runza, you can add a little bit of butter on top and seasoning salt.  It will help make the runza darken plus gives it more flavor.  Bake at 350 degrees for 18 – 20 minutes or until golden brown.  This recipe makes 16.  This recipe also freezes well.

    It’s not happy people who are thankful it is thankful people who are happy.

Do all things with love.

FullSizeRender

My latest Quilt!


Mark’s Beer Cheese Soup

Standard

IMG_0545IMG_0544

Happy Fall!  This is the Beer Chesse soup recipe we make each year for our pumpkin carving party.  It is always a hit!

Ingredients:

1/2 c. butter

1/2 c. flour

4 c. chicken broth

1 1/2 c. half and half

16 oz Cheez Whiz

15 oz. Tostitos Cheese Dip – Medium

6 oz. beer

1 tsp. Worcestershire sauce

1/4 c. chives

1/2 cup cut up peppperoni or bacon

Optional Panera Bread sourdough bread bowls

  1. Cream butter and flour over heat until smooth.
  2. Next slowly add enough chicken broth while stirring to make a smooth paste.  Stir in remaining chicken broth and half and half.
  3. Add Cheez Whiz and Tostitos Cheese Dip, stir until creamy.
  4. Stir in beer, Worcestershire, pepperoni/or bacon and chives.
  5. Simmer 15 minutes, stirring occasionally.  This is also a great crockpot recipe. Make enough soup for 8.  We serve the soup in Panera Bread sourdough bowls.  When you order it make sure you request the bread bowls cored.

Fall has arrived.  Behold the changing leaves and enjoy the crisp breeze.  Let your eyes take in the burst of color.  Transformation is a foot and hope is in the air.  Happy Autumn!

IMG_0593


Oriental night in my neck of the woods

Standard


I live in a small bedroom community outside of Seattle. It is the best kept secret in our area.  The scenery is breath taking but the draw back is your choices of restaurants are limited. I haven’t found a favorite oriental restaurant at this point unless I head into Seattle.   All of these recipes are my daughter and I favorite oriental recipes to make. The sweet and spicy chicken with rice dish is one recipe she doesn’t mind helping me with.  All three recipes are winners!

Sweet and Spicy Chicken

IMG_0254

Ingredients:

2 lbs. boneless chicken breasts (cut into 1/2 inch pieces)

1/4 cup soy sauce

2 Tbs. honey

1 Tbs. brown sugar

2 tsp. minced garlic

1 1/2 Tbs. sriracha sauce

1/2 Tbs. cornstarch

1 Tbls cooking oil

Veggies (we like green beans, bamboo shoots, green peppers and carrots)

  1. In skillet, cook cut boneless chicken breasts with the 1 Tbs. cooking oil. Cook until brown on both sides.
  2. Mix all other ingredients in bowl.
  3. Add the sauce to the cooked chicken, and cook until sauce thickens. Add favorite veggies.
  4.  Stir in sauce until the chicken and veggies are well coated and heated thoroughly.
  5. Serve with rice.
  6. This is one recipe we never get sick of….enjoy!


 Baked Bacon, Cream Cheese and Jalapeno Popper

IMG_0934

This is a great recipe to put in freeze bags, freeze and eat later.

Ingredients:

IMG_0225

24 wonton wrappers

4 oz. cream cheese, softened

1/2 c. sour cream

3 – 4 cooked strips of bacon

3 chopped green onions

1/2 cup mozzarella cheese

1 jalapeno (seeded and chopped)

  1. Preheat oven to 400 degrees
  2. In medium mixing bowl, stir together cream cheese, sour cream, bacon, green onion, mozzarella cheese and chopped jalapeños. 

  3. Place wonton wrappers on cookie sheet and with spoon add mixture on wrapper.
  4. Add little water to two edges of wrapper and press together to make the triangle.
  5. Bake for 10 minutes and enjoy.


Hot and Sour Soup

IMG_0667.JPG

Ingredients:

6 oz. chicken breast (cut into strips and cooked)

1 qt. chicken stock

1 cup soy sauce

1 tsp. white pepper

6 oz. bamboo shoots (cut into strips)

6 oz wood ear mushrooms

1/2 cup cornstarch

1/2 cup water

2 eggs (beaten)

4 oz. white vinegar

6 oz Silken tofu (cut into strips)

  1. Cook chicken strips and set aside.
  2. Bring chicken stock to a boil.  Next add soy sauce, white pepper, bamboo, mushrooms,  and cooked chicken.  Stir.  Let cook for 3 minutes.
  3. While cooking, in separate bowl combine cornstarch and water.  Add this mixture little at a time and stir until thick.
  4. Add eggs while stirring and cook for 30 seconds or until eggs are done. Turn off heat and add vinegar and tofu.
  5. Spoon soup into bowls and very yummy!


Life isn’t about finding yourself.  Life is about creating yourself.  

– George Bernard Shaw